This chapter is an introduction to building a complete Android app. The chapter includes creating a new app project, exploring the components of an Android app, setting up the emulator to run and test apps, and building a variation of the traditional Hello World app
This and the following chapters in this part assume that you have access to Eclipse and that it is set up for Android development. If this is not the case, refer to Appendix A, “Installing Eclipse and Setup for Android Development” before continuing.
Eclipse is a powerful, open source, integrated development environment (IDE) that facilitates the creation of desktop, mobile, and web applications. Eclipse is a highly versatile and adaptable tool. Many types of applications and programming languages can be used by adding different “plug-ins.” For example, plug-ins are available for a very large number of programming languages as diverse as COBOL, PHP, Java, Ruby, and C++, to name a few. Additionally, plug-ins provide the capability to develop for different platforms, such as Android, Blackberry, and Windows. Many of the tools in the Eclipse IDE will be explained through the act of developing an Android app.
Android is a mobile operating system designed for smartphones and tablets. The operating system is very powerful, enabling access to a diverse set of hardware resources on a smartphone or tablet. Android is provided by Google and is continually updated, improved, and extended. This makes the development of apps for Android smartphones and tablets both exciting and challenging. As with Eclipse, the many features of the Android environment are best explained through the act of developing an app.
Eclipse uses the concept of a workspace for organizing projects. Because Eclipse can be used to develop many types of applications, this is very useful. A workspace, in reality, is just a folder on some drive on your computer. The folder contains the application’s code and resources, code libraries used by the application (or references to them), and metadata that is used to keep track of environment information for the workspace.
To begin, run Eclipse. The Workspace Launcher dialog window opens, asking which workspace you want to use. The default workspace (or last used) is displayed in the dialog window’s text box. Most IDEs are designed with the idea that developers are going to be working on the same machine each time they work on a project. This can cause problems in the education environment where students do not have the ability to work on the same machine and/or store their work on the machine they are currently working on. If you are using your own machine, you can skip to the next section; your workspace was created when you installed Eclipse and is ready to go. However, if you are working in an environment where you cannot use the same machine each time, you need to set up a workspace on either a flash drive or on a network drive. Determine which of these options is best for your situation and perform the following steps:
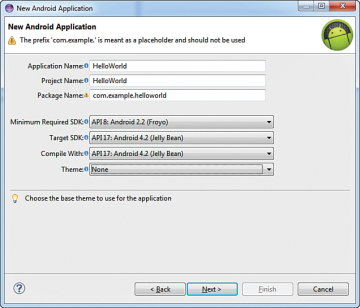
The traditional beginning tutorial for many different languages and development platforms is “Hello World.” Your first Android app will be a slightly modified “Hello World” app. In Eclipse, all Android apps are created within a project. To create your first app, you will have to create your first project. Creating a new project requires stepping through a series of windows and making choices to configure your app. To get started, from Eclipse’s main menu choose File > New > Android Application Project. You should see the New Android Application dialog window, as shown in Figure 3.1.

Figure 3.1 Initial new Android application window configured for “Hello World.”
Fill out the screen as shown. The application name is displayed on the phone’s screen as the name of the app. You can use spaces if you want. As you type the name, the project name and package name will be completed. There are no spaces allowed in these items. The wizard will remove them as you type. Don’t put them back in either of these fields. The package name is important. For this initial project you don’t need to change the default. However, if you are building an app for sale, in place of “example” you should put your company name. This identifier will be used in the Play Store to link your apps to the services they use and connect all your apps.
Next, click the Minimum Required SDK drop-down. A list of potential Android SDKs are listed. SDK stands for Software Development Kit, and it is a set of tools and code libraries used to write software for a specific platform. Each release of the Android OS is associated with an SDK so that programmers can write code for that platform. An application programming interface (API) is a set of routines that allow a program (app) to access the resources of the operating system to provide functionality to the user. The minimum required SDK determines what phones and other Android devices will be able to install your app. (Phones and tablets using Android operating systems earlier than this selection will not even see your app in the Play Store.) This selection will also determine the features you can program into your app. The recommended minimum is the default: Froyo API 8. An app that has this minimum will be accessible to more than 90% of the devices “in the wild.”
The Target SDK should usually be set to the latest version of the Android operating system. At the writing of this book, that version is the Jelly Bean (API 17). After you release an app, you should periodically update these values and recompile your app as new versions of Android are released. At times, new versions of the operating system can affect the performance of your app, so it is best to keep the app up to date. The Compile With target should also be the latest SDK.
Themes are a useful way to ensure a consistent look for your app. However, because this is an introduction you will not be using them in this book. Click the drop-down and select None as your theme.
After you have verified that your selections match those in Figure 3.1, click the Next button and the Configure Project window will be displayed. You should accept the defaults on this screen. After you learn the app creation process, you may want to modify the default settings to better match your requirements. However, by using the defaults, some work is done for you that can easily be changed later as needed. Click the Next button to display the Configure Launcher Icon window.
The Configure Launcher Icon window allows you to associate an icon with your app that will be displayed on the phone’s screen along with the app name. Notice the different sizes of the icons. If you are providing an icon for your app, you will have to supply several sizes of the same picture. This is because Android apps can run on any Android device that meets the app’s SDK requirements. However, these devices can have different screen resolutions and different screen sizes. By supplying different icon sizes, the app will pick the one that best matches the device it is running on. This helps ensure that your app will show up as you design it, regardless of the characteristics of the device it is running on. Suggested sizes for app icons are 32×32, 48×48, 72×72, 96×96, and 144×144 pixels for low to extra high density screens. Accept the default icon for this app by clicking the Next button.
The Create Activity window is the next step in configuring your project. An Activity is a core component of any Android application. Activities are typically associated with a visible screen. Most of the core functionality of an app is provided by an activity and its associated screen (called a layout). Click among the different activity options. Notice that when you have selected some of them, the Next button is disabled. The choices are limited by your choice of minimum and target SDK. Eclipse won’t let you use features that will not work on the devices you targeted. In this case, because you selected API 8 as the minimum SDK that your app would be allowed to run on, some activity types are not available, even though they are available in the target SDK you selected.
From the list of possible activities, choose Blank Activity and click the Next button. The Blank Activity window is displayed (Figure 3.2). This allows us to configure the first Activity in our app. With this screen we can change the name of the activities we create. In the Activity Name text box, delete MainActivity and type HelloWorldActivity. Notice below Activity Name is Layout Name. As you typed in the activity name, the text in this box changed to reflect the text you entered. A layout is an XML file that provides the user interface for the activity. Layouts are discussed in detail later. For now, just remember that every activity has an associated layout file.
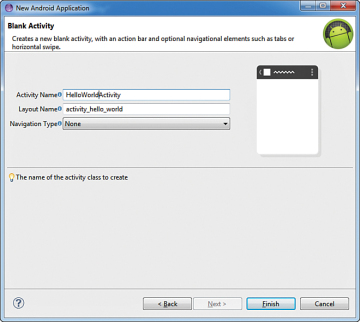
Figure 3.2 Blank Activity window with default selections.
The final item on this page is Navigation Type. Select it and click among the options. Notice that just like the Create Activity window, you are not allowed to use some navigation types. Again this is based on the SDK choices you made earlier. Select None as your Navigation Type and click Finish. Your app project is created! Depending on the capability of your computer, it may take some time to create the project. When Eclipse has finished creating your project, your Eclipse environment should look like Figure 3.3.
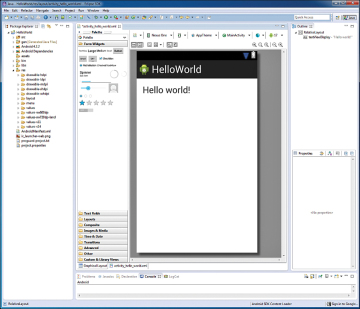
Figure 3.3 Eclipse with the newly created Hello World project.
Many of the items in the IDE will be explained as needed. For now you will examine just a few. The top center section is the Editor. Much of the development work is done here, including the UI design and writing code. It should currently be displaying the layout for the HelloWorldActivity in Graphical Layout mode. You can switch between graphical layout and the XML code that generates the layout with the tabs below the layout. One tab will always say Graphical Layout. The other will be the filename of the layout. In this case it is activity_helloworld.xml.
The left side of the IDE shows the Package Explorer. The Package Explorer displays the structure of the Android app and is used to move between different components of the app. Many of these items will be generated for you, and many others you will work with as you create your app. The src folder will contain all the Java code files for the app. Each file typically represents one class. Double-click the folder and its subfolders until you see HelloWorldActivity.java. This is where the code to create the activity’s functionality is written. Double-click the HelloWorld.java file. The file contents are displayed in the editor with some Java code listed. This code is explained later.
Next, look for the res folder in the Package Explorer. This folder contains a number of folders that all contain a different kind of resource file needed for your Android app. One very important note about resource files: There are no capital letters allowed in the file names! Double-click through the drawable-xxx folders. The drawable folders are for images. Android uses Portable Network Graphics (PNG) files for its images. Notice the ic_launcher.png file is in all the drawable folders except the drawable-lhdp folder. Each one of these files is the launcher icon in a different size to match the size recommendations for different screen resolutions. The lhdp folder does not contain an icon because no Android devices with low resolution are available with an API 8 or higher. When your app is installed on a device, Android automatically uses the one appropriate for the device it is installed in by selecting it from the correct folder.
Next is the layout folder. This folder holds all the layouts for the user interface of your app. The menu folder holds the menu items to be displayed in your app when a user clicks the device’s menu button. Menu functionality is not required for an app, and this book will not work with them.
The final set of folders is that of the values folders. Double-click the values folder. Three XML files will be displayed: dimens.xml, strings.xml, and styles.xml. The values files hold configuration data for an Android app. Android uses this information to limit the hard-coding of potentially changeable data. For example, the dimens.xml file could hold a value for screen title size that could be reused on each layout in the app. If you later decide that you want the screen title size to be different, you only have to change the value in the dimens.xml file and it automatically applies the new size to all titles that use that dimension. The values folders with a dash and number or other information are for values to be used for specific versions of the Android operating system. This enables the developer to take advantage of different OS capabilities within the same app. Some common values files are described below:
The final and very important item in the Package Explorer that we will examine is the AndroidManifest.xml file. The manifest file is not in a folder but is listed as one of the folder independent files following all the folders in the project. Double-click this file. The Manifest editor will be displayed in the editor. The manifest is used to configure the whole app and tell the device it is installed on what it can and should be able to do. There are multiple tabs (at the bottom of the editor) associated with the manifest. These are used to configure different aspects of your app. The Manifest tab (which is the initial tab open) includes several important elements. First, note the Version Code and Version Name elements. Version code is an integer value. It is used to indicate that there is a new version of the app available. Increasing the value enables the Play Store to notify users of the app that a new version is available. It also controls the install of the upgrade so that no user data is lost during an upgrade. The Version Name is the displayed version of your app. Beyond that it is nonfunctioning. However, it is good practice to have a consistent approach to changing this so that you know what version of the app is at issue when communicating with users about their problems with the app. Click Uses Sdk. The current selections for minimum and target SDK are displayed. These can be modified here. Next click the Application tab at the bottom of the editor. This tab provides the capability to configure specific operational and display elements of the app. Finally, click the AndroidManifest.xml tab. The selections made in the editors generate code that is displayed here.
Although the tabs in the Manifest editor can be used to create a basic configuration of the manifest, the ability to read and manipulate XML is a critical skill for the Android app developer. Modifying a manifest to allow your app to do more advanced behaviors is common, and most online help on doing so, either from the Android Developer site or developer forums, is provided in XML. To get started, take a look at the manifest components in the AndroidManifest.xml file (Listing 3.1).
xml version="1.0"encoding="utf-8"?> //1 manifest xmlns:android="http://schemas.android.com/apk/res/android"package="com.example.helloworld"android:versionCode="1"android:versionName="1.0"> //2 uses-sdk android:minSdkVersion="8"android:targetSdkVersion="17"/> //3 application android:allowBackup="true"android:icon="@drawable/ic_launcher"android:label="@string/app_name"android:theme="@style/AppTheme"> //4 activity android:name="com.example.helloworld.HelloWorldActivity" android:label="@string/app_name" > //5 intent-filter> //6 action android:name="android.intent.action.MAIN"/> //7 category android:name="android.intent.category.LAUNCHER"/> intent-filter> activity> application>manifest>
The manifest contains a number of XML elements. Those elements and their attributes define basic operational aspects of your app. Refer to the numbers in Listing 3.1 to see the complete code associated with each element explanation below.
Now that you have some understanding of the development environment, you are almost ready to start creating the app. Don’t worry. Future projects will take less time to set up. You could start coding at this point, but until you tell Eclipse how to execute the app, you will not be able to see your results. Therefore, the next step will be to set up the test environment.
Android apps may be tested on either the emulator provided by the Eclipse IDE or on an Android device. The emulator is a program that simulates an Android device. If you choose to test on the emulator, you should also test on several varieties of real devices before you publish your app. Real devices often perform differently than the emulator. If you do not test on a real device, you will likely have many unhappy users.
To set up the emulator, we first must set up an Android Virtual Device (AVD). An AVD is a software replication of one or more types of Android devices. Multiple AVDs with different characteristics may be set up for testing. To set up an AVD we use the AVD Manager. From the main menu select Window > Android Device Manager to display the Android Virtual Device Manager (Figure 3.4).
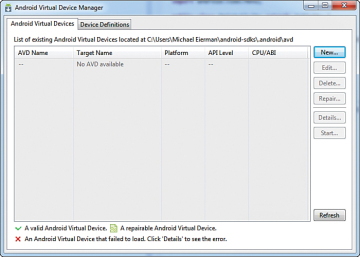
Figure 3.4 Android Device Manager in initial state.
The manager opens with the Virtual Devices tab displayed. Click the Device Definitions tab. This displays all the device configurations your system knows about. Scroll through these to see how many devices your app could run on. Press the Device Definitions tab and then click the New button. The Create New Android Virtual Device (AVD) window is displayed. Complete the device definition as follows, changing only these options:
When you click the Device drop-down, a large number of devices are available. Scroll down the list to find the device: 3.2 QVGA (ADP2) (320 x 480: mdpi) and select it. After you’ve selected the device, choose ARM from the CPU/ABI drop-down. Most devices have an SD card. However, if you want to test your app for those that do not, don’t change anything for the SD Card option. Click OK. The new AVD will be displayed in the Android Virtual Devices tab. Click the new AVD named MyTestDevice that now shows in the existing AVD list, and the buttons on the right of the AVD Manager will be enabled. Click the Start button and the Launch Options window will be displayed. Leave all the defaults. Checking the Scale Display to Real Size box will show the virtual device at the size of the real device. However, this can be hard to use during initial development. Checking the Wipe User Data box will wipe out any data created in a previous session. It is useful to leave the data intact so that you will not have to reenter data every time you want to test some aspect of the app.
I like to start my development with one of the smaller devices because I find it easier to scale up when developing the user interface than to scale down. Also, I like to pick a lower API for the device for similar reasons. Later, you can create different AVDs to test different device configurations.
Click Launch. The Start Android Emulator window will display and start loading the AVD. When it is done, the virtual device displays (Figure 3.5) and begins further loading. The speed at which the device loads depends greatly on your computer. At times it can be quite slow. If I am testing with the emulator, my first task when beginning any development session is to start the virtual device so that it is ready when I am. After the AVD is displayed, you can close the Start Android Emulator and AVD Manager windows. The AVD will remain running.
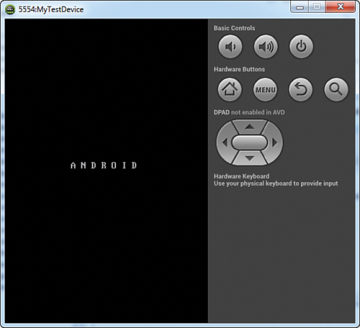
Figure 3.5 Android Emulator at initial launch.
The final step in setting up the test environment is to tell our app to use this newly created AVD. To do this you need to set up a Run Configurations.